


Resources
This page has been automatically translated using the Google Translate API services. We are working on improving texts. Thank you for your understanding and patience.
If we internationalize everything, we end up with rules that stifle freedom and innovation. Myron Scholes
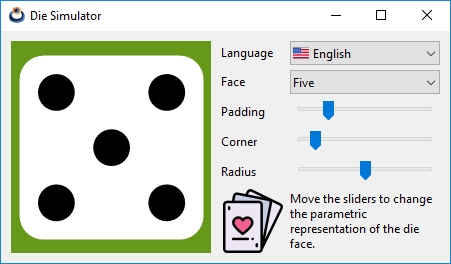
Resources are data that are required by the application but do not reside in the area of the executable. In other words, they are not directly accessible through program variables, but rather have to be pre-loaded before they can be used. The most common are the texts and images used in the user interface, although any type of file can become a resource (sounds, fonts, 3d models, html pages, etc). To illustrate its use with a real example, we return to the Die application (Figure 1), already covered in previous chapters.
1. Types of resources
- Texts: Although it is very easy to include texts in the code as C variables, in practice this is not advisable for two reasons: The first is that, normally, it is not the programmers who They compose the messages that the program displays. By separating them into a separate file, other team members can review and edit them without having to directly access the code. The second reason is internationalization. It is an almost essential requirement today to be able to change the language of the program and this can involve several members of the team, as well as the fact that several text strings refer to the same message. Therefore, extracting them from the source code will be almost essential.
- Images: It is not usual for the program icons to change depending on the language, although it may be the case. The tricky thing here is transforming a .jpg or .png file into a C variable (Listing 1). You have to serialize the file and paste it into the code, something very tedious and difficult for the programmer to maintain. It is preferable to have the images in a separate folder and access them at runtime.
- Files: Apart from text and images, any file can become a resource. In this case, the application will receive a block of bytes with its content, which it must know how to interpret.
1 2 3 4 5 6 |
2. Create resources
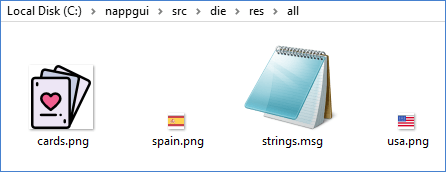
If we go to the source directory of the application (/die), we see that there is a folder called /res added by CMake when creating the project. Inside there are several logo.* files with the Application icon.
You can also see a folder called /res/res_die which wasn't created by CMake, but added later when writing the program. This subfolder is considered a resource pack and will contain a set of texts, images or files that will be loaded "in bulk" at some point in the execution. We can create as many packages as necessary depending on the size and logic of our program.
In large applications, organize your resources in such a way that it is not necessary to load all of them when starting the application. Certain resources may only be needed when the user performs some action.
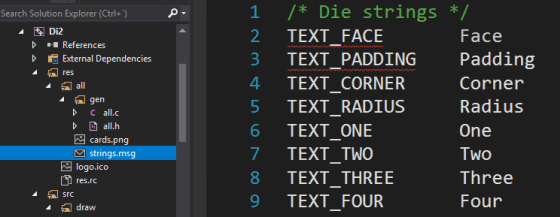
You will see that inside /res/res_die there is a strings.msg whose content is shown below:
1 2 3 4 5 6 7 8 9 10 11 12 13 14 15 16 |
/* Die strings */
TEXT_FACE       Face
TEXT_PADDING    Padding
TEXT_CORNER     Corner
TEXT_RADIUS     Radius
TEXT_ONE        One
TEXT_TWO        Two
TEXT_THREE      Three
TEXT_FOUR       Four
TEXT_FIVE       Five
TEXT_SIX        Six
TEXT_TITLE      Die Simulator
TEXT_INFO       Move the sliders to change the parametric representation of the die face.
TEXT_LANG       Language
TEXT_ENGLISH    English
TEXT_SPANISH    Spanish
|
Also contains the cards.png image and the spain.png and usa.png (Figure 2) icons.
src/die/res/res_die.Each line within the strings.msg file defines a new message consisting of an identifier (eg TEXT_FACE) followed by the text to be displayed in the program ( Face in this case). Text is considered from the first non-blank character after the identifier to the end of the line. You don't need to put it in quotes ("Face") like you do in C:
|
|
BILLY Billy "the Kid" was an American Old West outlaw. OTHER Other text. |
You also don't have to use escape sequences ('\\', '\'', ...), with the single exception of '\n' for multi-line messages:
|
|
TWO_LINES This is the first line\nAnd this is the second. |
The message identifier follows the rules for C identifiers, except that letters must be uppercase:
|
|
_ID1 Ok 0ID2 Wrong!! id3 Wrong!! ID3 Ok |
Messages accept any Unicode character. We can split the texts into as many *.msg files as needed and they must be stored in UTF8 format.
Visual Studio does not save files in UTF8 by default. Be sure to do so on every*.msgthat contains non-US-ASCII characters.File->Save As->Save with encoding->Unicode (UTF8 Without Signature) - Codepage 65001.
3. Internationalization (i18n)
We have used English as the main language in the program, but we want it to be translated into Spanish as well. To do this we go back to the /res/res_die folder, where we see the /es_es subdirectory that contains another strings.msg file. The identifiers in that file are the same as in /res_die/strings.msg but the texts are in another language. Depending on the selected language, the program will use one version or another.
1 2 3 4 5 6 7 8 9 10 11 12 13 14 15 16 |
/* Die strings */
TEXT_FACE       Cara
TEXT_PADDING    Margen
TEXT_CORNER     Borde
TEXT_RADIUS     Radio
TEXT_ONE        Uno
TEXT_TWO        Dos
TEXT_THREE      Tres
TEXT_FOUR       Cuatro
TEXT_FIVE       Cinco
TEXT_SIX        Seis
TEXT_TITLE      Simulador de dado
TEXT_INFO       Mueve los sliders para cambiar la representación paramétrica de la cara del dado.
TEXT_LANG       Idioma
TEXT_ENGLISH    Inglés
TEXT_SPANISH    Español
|
We must take into account some simple rules when locating resources:
- If the local version of a resource does not exist, the global version of the resource will be used. CMake will warn if there is untranslated text nrc warnings.
- Those resources only present in local folders will be ignored. It is imperative that the global version of each exists.
- Resource "subpackages" are not allowed. Only two levels will be processed:
src/res/packnamefor globals andsrc/res/packname/localfor locals. - Resource bundles must have a unique name within the solution. One strategy might be to prepend the project name:
/appname_pack1,libname_pack2, etc. - Existing resources in the root folder (
/res) will be ignored. All resources must be contained in a package/res/pack1/,/res/pack2/, etc. - Localized texts must have the same identifier as their global counterpart. Otherwise they are considered different messages.
- To create a localized version of an image or other file, include it in its corresponding local folder (e.g.
/res/res_die/es_es/cards.png) using the same file name than the global version. - To name the localized folders, use the two-letter language code ISO 639-1 (in, is, fr , de, zh, ...) and, optionally, the two-letter country code ISO-3166 (en_us, en_gb, ...).
4. Runtime translation
For each resource bundle, CMake creates a *.h with the same name as the folder: res_die.h in this case (Listing 4) . This file contains the resource identifiers, as well as a function that allows us to access them res_die_respack(). In (Listing 5) we see the actions to be carried out to use these resources in our program.
res_die.h.
1 2 3 4 5 6 7 8 9 10 11 12 13 14 15 16 17 18 19 20 21 22 23 24 25 26 27 28 29 30 31 |
/* Automatic generated by NAppGUI Resource Compiler (nrc-r1490) */ #include "core.hxx" __EXTERN_C /* Messages */ extern ResId TEXT_FACE; extern ResId TEXT_PADDING; extern ResId TEXT_CORNER; extern ResId TEXT_RADIUS; extern ResId TEXT_ONE; extern ResId TEXT_TWO; extern ResId TEXT_THREE; extern ResId TEXT_FOUR; extern ResId TEXT_FIVE; extern ResId TEXT_SIX; extern ResId TEXT_TITLE; extern ResId TEXT_INFO; extern ResId TEXT_LANG; extern ResId TEXT_ENGLISH; extern ResId TEXT_SPANISH; /* Files */ extern ResId CARDS_PNG; extern ResId SPAIN_PNG; extern ResId USA_PNG; ResPack *res_die_respack(const char_t *local); __END_C |
1 2 3 4 5 6 7 8 9 10 11 12 13 14 15 |
#include "res_die.h" gui_respack(res_die_respack); gui_language(""); ... label_text(label1, TEXT_FACE); imageview_image(vimg, CARDS_PNG); ... static void i_OnLang(App *app, Event *e) { const EvButton *params = event_params(e, EvButton); const char_t *lang = params->index == 0 ? "en_us" : "es_es"; gui_language(lang); unref(app); } |
- Line 1 includes the (Listing 4) resource bundle header, which is automatically generated by CMake.
- Line 3 registers the package in Gui, the library in charge of the graphical interface. If the application had more resource packs we would add them in the same way.
- Line 4 sets the default language (English).
- Lines 6 and 7 assign a text and an image to two controls respectively. Identifiers are defined in
"res_die.h", as we just saw. - Line 13 translates the entire interface in response to a change in the PopUp control (Figure 3).
Basically, a call to gui_language, involves coordinating three actions:
- Load the located resources and replace them with the current ones.
- Assign the new texts and images to all the controls and menus of the program.
- Resize the windows and menus, since changing texts and images will influence the size of the controls.
5. Edit resources
To add new resource files or delete any of the existing ones, we just have to go to the res/res_die folder through the file explorer and do it there directly. The *.msg message files can be edited from within Visual Studio, as CMake includes them within the (Figure 4) IDE. After making any changes to the resource folder or editing a *.msg file, we must relaunch CMake so that these modifications are integrated back into the project. After each update, the identifiers of the new resources will be created and those whose associated resource has disappeared will be deleted, which will cause compilation errors that will facilitate the correction of the code.
6. Manual management
Although the usual thing will be to delegate the management of resources to the gui library, it is possible to access the content of the packages directly, as we see in (Listing 6).
1 2 3 4 5 6 7 8 |
#include "res_die.h" ResPack *pack = res_die_respack("es_es"); ... label_text(label1, respack_text(pack, TEXT_FACE)); imageview_image(vimg, image_from_resource(pack, CARDS_PNG)); ... respack_destroy(&pack); |
- Line 1 includes the resource bundle header.
- Line 3 creates an object with the content of the package in the Spanish language. Each resource pack will provide its own constructor, whose name will start with the name of its
xxxx_respack() folder. - Lines 5 and 6 get a text and an image respectively to assign to interface controls.
- Line 8 destroys the resource bundle, at the end of its use.
There is a big difference between allocating resources using ResId or using respack_ (Listing 7) functions. In the first case, the label control will be "sensitive" to language changes made by gui_language . However, in cases 2 and 3 a constant text has been assigned to the control, which will not be affected by this function. We will be responsible for changing the text, if necessary.
1 2 3 |
label_text(label1, TEXT_FACE); label_text(label1, respack_text(pack, TEXT_FACE)); label_text(label1, "Face"); |
The choice of one access mode or another will depend on the requirements of the program. We remind you that in order to carry out automatic translations, resources must be registered with gui_respack.
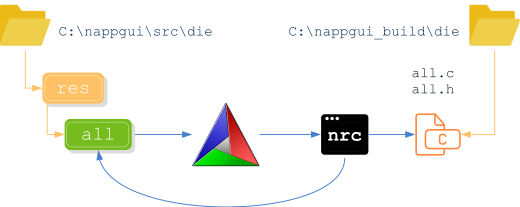
7. Resource processing
Let's see in a little more detail how NAppGUI generates resource modules. By setting NRC_EMBEDDED in the nap_desktop_app() command, we tell CMake to process the Die project's resources. We can also choose the NRC_PACKED option which we will talk about below. When we launch CMake, the subfolders within the res directory of each project are traversed, calling the nrc (NAppGUI Resource Compiler) utility (Figure 5). This program is located in the tools/nrc folder and is automatically compiled before CMake generates the NAppGUI-SDK build project. For each resource package, nrc creates two source files (a .c and a .h) and links them to the project. The .h contains the identifiers and the constructor that we have seen in (Listing 4). For its part, .c implements the package implementation based on the content of each folder and the nrcMode mode.
Files created by nrc are considered generated code and are not stored in thesrcfolder but in thebuildfolder. They will be updated every time CMake is run, regardless of the platform we are working on. In contrast, the original resource files (located in theresfolder) are considered part of the source code.
8. Resource distribution
In the previous chapter, when creating the Visual Studio solution, we indicated that the NRC_EMBEDDED constant had to be used in the nap_desktop_app() statement within the CMakeLists.txt file. There are two other modes related to resource management that can be configured separately within each command nap_desktop_app(), nap_command_app() or nap_library() :
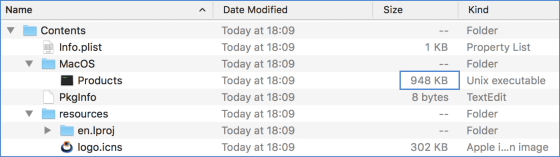
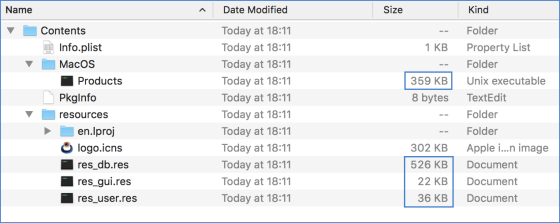
NRC_NONE: CMake will ignore the contents of theresfolder, except for the application icon. No resource packs will be generated even if there is content inside this folder.NRC_EMBEDDED: The resources, with all their translations, are embedded as part of the (Figure 6) executable. It is a very interesting option for small or medium-sized applications, since we will supply the entire program in a single*.exefile. An installer will not be necessary and we will have the certainty that the software will not fail due to the lack of some external file. The drawback is that, obviously, the size of the executable will grow considerably, so it is not advisable in programs with many resources, very heavy, or with a multitude of translations.NRC_PACKED: For each resource package, a*.resfile will be created external to the executable that will be loaded and released at runtime as needed (Figure 7). The advantages of this method are the disadvantages of the previous one and vice versa: Smaller executables, but with external dependencies (the.resthemselves) that must be distributed together. Memory usage will also be optimized by being able to load*.reson demand.
CMake manages the location of the resource packages for us. On Windows and Linux applications it will copy all *.res into the executable directory. On macOS it will place them in the resources folder of the bundle. A very important fact is that we don't have to modify the source code when switching from one modality to another. nrc already takes care of managing the payload based on the package type. It makes sense to start with NRC_EMBEDDED, and if the project grows, change to NRC_PACKED. We just have to launch CMake again and recompile the project for the change to take effect.
On Windows and Linux the*.resfiles must always be installed in the same directory as the executable. For macOS, CMake generates a distribution-ready bundle and installs the resource bundles in the/resourcesdirectory of that bundle.
9. nrc warnings
nrc is a silent script whose work is integrated into the CMake build process, mostly unnoticed. But there are times when you detect anomalies in the resource directories and you need to let us know in some way. In these cases a red line will appear in the CMake console indicating the affected project and package(s) (Figure 8). The details are dumped into the NRCLog.txt file located in the generated resources folder (CMake displays the full path).

If the bugs are critical, nrc will not be able to generate the *.h and *.c associated with the package, preventing the application from crashing. can compile (in essence it is still a compilation error). Other times they are mere warnings that should be fixed, but they allow you to continue compiling. Specifically, the critical errors that affect nrc are the following: (we show them in English as they are written in NRCLog.txt).
- MsgError (%s:%d): Comment not closed (%s).
- MsgError (%s:%d): Invalid TEXT_ID (%s).
- MsgError (%s:%d): Unexpected end of file after string ID (%s).
- Duplicate resource id in '%s' (%s).
- Can't load resource file '%s'.
- Error reading '%s' resource directory.
- Error reading '%s' subdirectories.
- Error creating '%s' header file.
- Error creating '%s' source file.
- Error creating '%s' packed file.
On the other hand, non-critical warnings:
- Empty message file '%s'.
- Ignored localized text '%s' in '%s'. Global resource doesn't exists.
- Ignored localized file '%s' in '%s'. Global resource doesn't exists.
- There is no localized version of the text '%s' in '%s'.
- Localized directory '%s' is empty or has invalid resources.
10. Application icon
When we create a new project, CMake sets a default icon for the application, which it places in the /res directory, with the name logo*. This image will be "embedded" in the executable and will be used by the operating system to render the application on the desktop (Figure 9). Windows and Linux also use it in the window title bar. We have three versions:
- logo256.ico: Version for Windows Vista and later. They must include the resolutions: 256x256, 48x48, 32x32 and 16x16.
- logo48.ico: Version for Linux and VisualStudio 2008 and 2005, which do not support 256x256 resolutions. This version only includes: 48x48, 32x32 and 16x16.
- logo.icns: Version for macOS. Resolutions 512x512, 256x256, 128x128, 32x32 and 16x16 both in normal resolution (@1x) and Retina Display (@2x).
CMake already takes care of using the appropriate version of the icon depending on the platform we are compiling on. To change the default icon, open the logo* files with some graphical editor (Figure 10), make the changes, and relaunch CMake. Very important: do not change the names of the files, they should always be logo256.ico, logo48.ico and logo.icns.
logo.ico.