


Remote compilation
This page has been automatically translated using the Google Translate API services. We are working on improving texts. Thank you for your understanding and patience.
We have already seen in Generators, compilers and IDEs how to compile our applications on different operating systems, as well as configure certain options depending on each one. However, it is possible that all development is carried out on the same platform (or even on the same machine by the same person) but we want to generate binaries in others in order to test the advances. A typical case might be working on Windows and checking, at the end of the day, that the changes have been well integrated into macOS and Linux. Recompiling the entire project on several computers is a boring, repetitive and slow task that forces us, systematically, to move from our position, update repositories, re-generate solutions, wait for everything to compile without errors and pack the results.
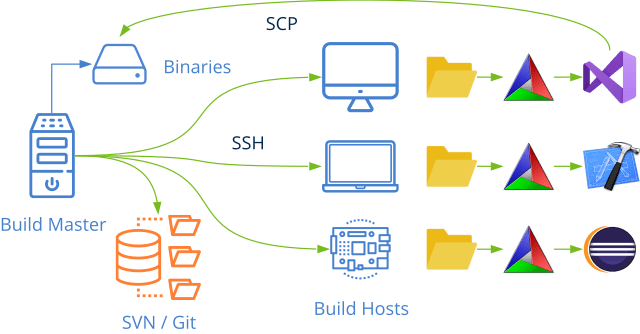
The remote compilation offers us the possibility of using the compilers of other machines on the network from our own computer, through the local network or the Internet. It is the previous step to Continuous Integration where an external program will work uninterruptedly, in the background and autonomously every time the content of the repository is modified (Figure 1).
1. Build grid
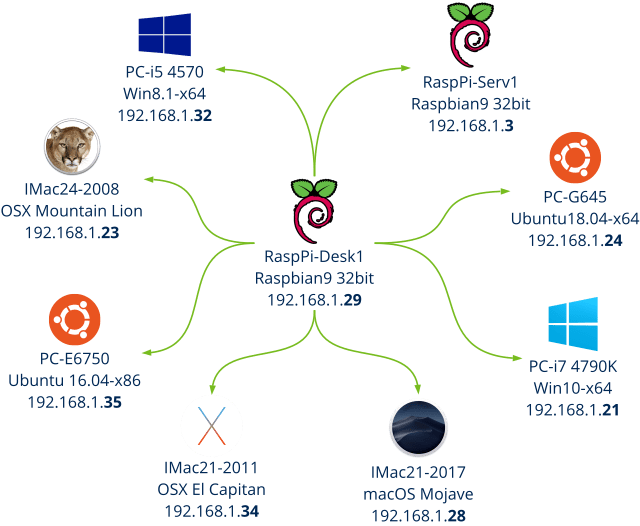
The first thing we have to do is set up a heterogeneous computer network where different machines coexist with the appropriate compilers (Figure 2) and that can communicate with each other Enable SSH. The main actors of this network are:
- Build Grid: Network formed by all the machines that will cooperate in compilation tasks. They can be distributed over the Internet.
- Build Master: Computer within the network that runs the Continuous Integration utility, coordinates the rest of the machines, stores the results and reports errors.
- Build Host/Slave: Machine for compilation and test tasks, which will be remotely managed by the Build Master.
- Build Agent: Configuration that identifies a compiler and CPU version. For example, the agent
v142_x64represents Visual Studio 2019 (VC++) 64bit. An agent can be executed by any Host that has the appropriate compiler installed. The Build Master will be in charge of balancing the load. - Build Profile: Profile that indicates all targets (libraries and/or executables) to be generated within a solution and which agents must intervene. The Build Master can handle several profiles at the same time.
- Build Config: Indicates the level of optimization and debug options of the compilation:
Debug,Release,RelWithDebInfo,MinSizeRel. Configurations.
2. Enable SSH
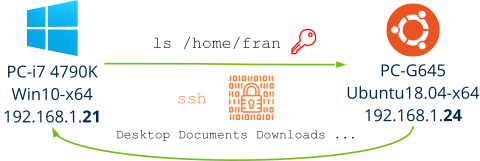
The basis of remote compilation is network communication or, more specifically, the possibility of executing commands remotely from one machine to another. Today the standard is SSH (Secure Shell), a protocol and application that allows executing commands over a network, adding an encryption layer between sender and receiver (Listing 1) (Listing 1). We must ensure that SSH is present and working on all machines of the Build Grid.
1 2 3 4 5 6 7 8 9 10 11 |
C:\Users>ssh fran@192.168.1.24 ls fran@192.168.1.24's password: Desktop Documents Downloads examples.desktop Music Pictures Public Templates Videos |
2.1. SSH in Windows
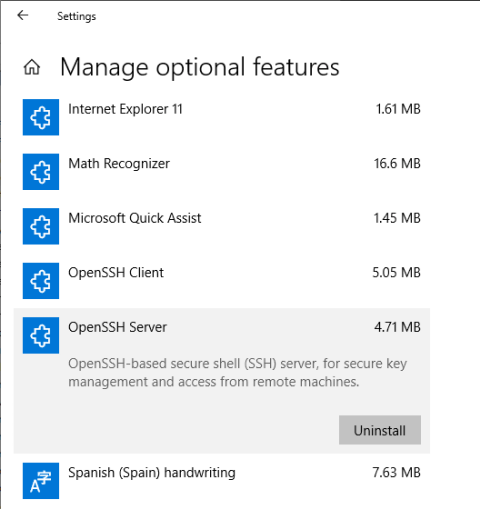
Windows 10 includes support for SSH, but it is not active by default. You must activate it in Settings->Apps->Manage Optional Features->Add a Feature->OpenSSH Client/Server (Figure 4). To ensure that service is running, run services.msc and starts OpenSSH SSH Server if he is not running anymore.
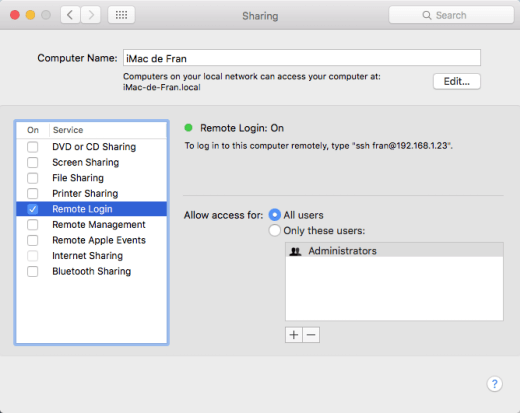
2.2. SSH in macOS
SSH is also included in Apple's operating systems. To activate it:
- Opens
System Preferencesfrom the Apple menu and click on the Sharing panel. - Activate the option Remote Login (Figure 5).
- This will instantly boot several services, including SFTP and SSH.
For security reasons, SSH does not access all the bash shell environment variables in macOS. This can cause a remote command to fail, but typing from a terminal on the machine itself does work. For example, this occurs when trying to run cmake or svnremote form. To correct it:
- We add the necessary paths to the variable
PATHin/.ssh/environment. - We edit the file
/private/etc/ssh/sshd_configor/etc/ssh/sshd_config, enabling the variablePermitUserEnvironment PATH,LANG. - We stopped and re-launched the service by check Remote Login for Sharing.
PATHin /.ssh/environment
1 |
PATH=$PATH:/bin:/usr/bin:/usr/local:/usr/local/bin:/Applications/CMake.app/Contents/bin |
2.3. SSH in Linux
By default, SSH is not included in Ubuntu. For this distribution and others based on Debian, the service is installed and activated with this command.
1 |
sudo apt-get install openssh-server -y |
2.4. SSH without password
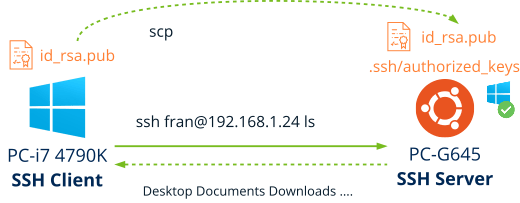
Once SSH is activated on all the machines in the network, we can already execute remote commands from the Build Master as we have seen in (Listing 1) . The problem is that SSH will continuously ask us for the password of the remote user, something that will hinder the automation of the CI system. To avoid this, we have to install the rsa certificate of the Build Master on all remote machines (the Build Host ) so that they recognize the issuer of the command and do not ask for a password.
- From the Build Master, open a terminal and type
ssh-keygen. This will generate two rsa certificates in.ssha private one, that will stay in the master and another public that will go to the host. - Copy the file
id_rsa.pubin the user directory of each Build Host. - Open a terminal on the Host and type:
- If everything went well, we can already execute a remote command without asking us for a password (Figure 6), since the SSH server running on the Build Host recognizes the Build Master computer.
1 2 3 4 5 6 7 8 9 10 11 12 13 14 15 16 17 18 19 20 21 |
fran~>ssh-keygen Generating public/private rsa key pair. Enter file in which to save the key (/home/fran/.ssh/id_rsa): Enter passphrase (empty for no passphrase): Enter same passphrase again: Your identification has been saved in /home/fran/.ssh/id_rsa. Your public key has been saved in /home/fran/.ssh/id_rsa.pub. The key fingerprint is: SHA256:Up6KjbnEV4Hgfo75YM393QdQsK3Z0aTNBz0DoirrW+c fran@192.168.1.24 The key's randomart image is: +---[RSA 2048]----+ | . ..oo..| | . . . . .o.X.| | . . o. ..+ B| | . o.o .+ ..| | ..o.S o.. | | . %o= . | | @.B... . | | o.=. o. . . .| | .oo E. . .. | +----[SHA256]-----+ |
1 2 |
cd .ssh scp id_rsa.pub fran@192.168.1.24:/Users/fran/.ssh |
1 2 3 4 5 |
cd .ssh type id_rsa.pub >> authorized_keys (Windows) ... cd .ssh cat id_rsa.pub >> authorized_keys (macOS/Linux) |
1 2 3 4 5 6 7 8 9 10 |
C:\Users>ssh fran@192.168.1.24 ls Desktop Documents Downloads examples.desktop Music Pictures Public Templates Videos |
2.5. SSH from C
The CI system must be able to launch SSH commands from the program itself instead of the terminal, in order to coordinate the Build Host to complete the tasks of the Build Profile . In (Listing 2) we see how to do it from the C language. In Launching processes you have more information about the NAppGUI multi-processing API.
1 2 3 4 5 6 7 8 9 10 11 12 13 |
Proc *proc = bproc_exec("ssh fran@192.168.1.24 ls", NULL, NULL); if (proc != NULL) { byte_t buffer[512]; uint32_t rsize; Stream *stm = stm_memory(1024); while (bproc_read(proc, buffer, sizeof(buffer), &rsize, NULL) == TRUE) stm_write(stm, buffer, rsize); bproc_wait(proc); bproc_close(&proc); return stm; } |
2.6. SSH to copy files
To copy files between remote machines, SSH includes the scp utility that also guarantees encryption.
1 |
scp fran@192.168.1.24:/build/Debug/core/libcore.a C:/pkg |
3. Step by step example
We are going to carry out the entire remote compilation process from a Windows machine to another macOS, whose IP is 192.168.1.41 and user fran. As usual in this tutorial, on each machine there are two main directories: nappgui_sdk with the source code of the projects and nappgui_build where the outputs generated by CMake and the compilers are written.
1 2 3 4 |
ssh fran@192.168.1.41 "cd /Users/fran/nappgui_sdk ; git pull" ssh fran@192.168.1.41 "cd /Users/fran/nappgui_build ; cmake -G\"Xcode\" -DCMAKE_OSX_DEPLOYMENT_TARGET:STRING="11.0" -DCMAKE_ARCHITECTURE:STRING=x86_64 -DCMAKE_PACKAGE:Bool=ON -DCMAKE_PACKAGE_GEN:String="TGZ" -DCMAKE_PACKAGE_PATH:String="/Users/fran/nappgui_bin" ../nappgui_sdk/src" > "C:\result\cmake.txt" ssh fran@192.168.1.41 "cd /Users/fran/nappgui_build ; xcodebuild -project NAppGUI.xcodeproj -alltargets -configuration Debug" > "C:\result\compile.txt" scp "fran@192.168.1.41:/Users/fran/nappgui_bin/Die*" "C:\result" |
- The first line updates the Git repository with the new possible changes.
- Then CMake is executed with the following parameters:
-G "Xcode":Generator-DCMAKE_OSX_DEPLOYMENT_TARGET:STRING="11.0":Big Sur SDK-DCMAKE_ARCHITECTURE:STRING=x86_64:Intel 64 bits architecture.-DCMAKE_PACKAGE:Bool=ON:We activate the packaging of the generated applications.-DCMAKE_PACKAGE_GEN:String="TGZ":The packaging format will be .TGZ.-DCMAKE_PACKAGE_PATH:String="/Users/fran/nappgui_bin":Directory where the final packages will be saved.> "C:\result\cmake.txt"The output of CMake is saved on the local machine. It will be useful to us to check possible errors.- The third line executes
xcodebuildso that it compiles all the projects of the solution, which has just been created by CMake. -configuration Debug:Chosen configuration.> "C:\result\compile.txt"Compiler output is saved on local machine.- Finally, the packaging of the
Dieapplication is copied to the local machine.
Don't be put off by the size of the console commands. The goal is not to type them by hand over and over again, but to include them in some script or application.
In NBuild you have more information about the continuous integration tool that we use in NAppGUI.