Build network
The first parameter when running nbuild, refers to the machine network configuration (-n network.json). We differentiate three categories:
- Master: It is the node where the nbuild program runs. It coordinates the rest of the nodes and executes the workflows. It does not need a machine with large capacities, since it will only perform coordination tasks. It does not use local disk storage and it is not necessary to include it in
network.jsonfile. - Drive: It is the storage node. It will contain the collection of source files, binaries, reports and execution logs. All this will be organized in folders representing the states (or versions) of the repository. It is recommended that this node has a large capacity SSD device.
- Host (or runner): Compiler node. It will have pre-installed compilers and CMake. The master node will activate these machines depending on the jobs to be done, indicated in
workflow.json. It is not necessary for these nodes to have a large storage capacity, since they do not store history or "garbage" between different compilations. They only handle temporary directories with partial results.
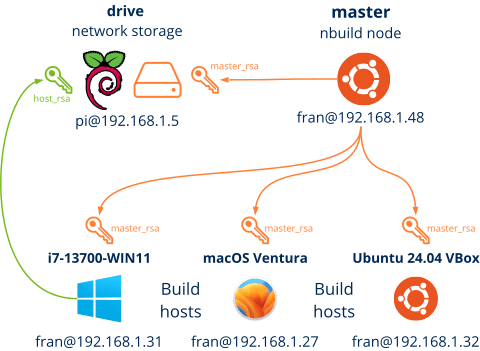
The master node will control the network through the SSH protocol (Figure 1). Therefore, it is necessary that each host has an active ssh server, with the master public key (id_master_rsa.pub) in order to receive the control commands. Similarly, the drive node will need the keys of each runner (id_runner_rsa.pub) to allow file read/write operations.

1. Virtualization
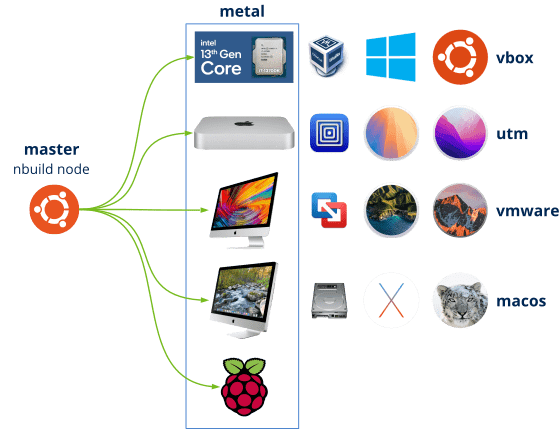
nbuild allows to control different types of machines, both physical and virtual, to carry out compilation and testing tasks (Figure 2). We can divide them into the following categories:

- metal: These are physical machines within the same network as nbuild. We can use them directly as compilation nodes or to host virtual machines. The main disadvantage is the large amount of hardware we will need if we want to test our code on a multitude of platforms. We will also have to turn them on/off manually, since nbuild cannot do it directly.
- vbox: VirtualBox machines are ideal for creating Windows and Linux compilation nodes. We can have a large number of different platforms within the same physical machine. nbuild can turn on/off this type of machines automatically when needed, in order not to exceed the capacities of the physical machines.
- utm: UTM is an ideal virtualization platform for the latest macOS systems with ARM processor. It requires a mac-ARM to run and runs macOS Monterey and later. Like VirtualBox, nbuild can turn on/off these machines on demand.
- vmware: Another great virtualization solution is VMware Fusion. In nbuild it is used to run somewhat outdated macOS Intel (from Sierra to Bigsur), as it is complicated to use VirtualBox with these platforms. They are also turned on/off on demand.
- macOS: These nodes represent different boot volumes associated to the same physical machine. They are not virtual machines. nbuild allows to re-boot the machine from one volume to another using macos bless. It is the ideal solution for very old MacOSX systems (from Snow Leopard to El Capitan) and require an obsolete iMac (2011), since the most modern ones do not support them. Starting with MacOSX El Capitan, Apple introduced SIP (System Integrity Protection) which makes it very complicated (or impossible) to use macos bless on Sierra and later systems. The main advantage is that we save the virtualization software (difficult to get), without forgetting that the nodes will run in native mode, with all available resources.
2. network.json
network.json includes the configuration of the drive machine, as well as each and every compilation host (Listing 1). As already indicated, the master node does not need to be included, since it is where the nbuild process itself runs.
1 2 3 4 5 6 7 8 9 10 11 12 13 14 15 16 17 18 19 20 |
{
"drive" : {
    "name" : "RPi 4 Raspbian 10 Buster",
    "path" : "/media/pi/builds",
    "login" : { "ip" : "192.168.1.5", "user" : "user", "pass" : "pass", "platform" : 3 }
},

"hosts" : [
{
    "name" : "Ubuntu 24.04 VBox",
    "workpath" : "/home/fran",
    "login" : { "ip" : "192.168.1.32", "user" : "user", "pass" : "pass", "platform" : 3 },
    "type" : "vbox",
    "vbox_uuid" : "288d134e-23e3-4546-acc2-ee04056f4c7b",
    "vbox_host" : "i7-13700-WIN11",
    "generators" : ["Unix Makefiles", "Ninja"],
    "tags" : ["ubuntu24", "x64"]
},
...
] }
|
name:Name of the machine. It must be unique.ip:IP address.user:User to connect to the remote machine.pass:Password.platform:Machine operating system: 1 Windows, 2 macOS, 3 Linux.path:Only in drive. Base directory for artifact storage.workpath:Temporary directory for compilation and testing tasks.type:metalfor physical machines.vboxfor VirtualBox machines.utmfor UTM machines.vmwarefor VMware machines.macosfor macOS boot volumes.vbox_uuid:Virtual machine code (only forvbox).vbox_host:Name of the machine that hosts the virtual machine (only forvbox). Must be of typemetal.utm_uuid:Virtual machine code (only forutm).utm_host:Name of the machine that hosts the virtual machine (only forutm). Must be of typemetal.vmware_path:Full path to the*.vmxfile containing the virtual machine description (only forVMware).vmware_host:Name of the machine that hosts the virtual machine (only forvmware). Must be of typemetal.macos_host:MacOS machine name (only formacos).macos_volume:Name of the boot volume connected to themacos_hostmachine (only formacos).generators:List of CMake generators supported on the node."Unix Makefiles","Ninja","Xcode","Visual Studio 17 2022", etc.tags:List of labels with the node's characteristics. They will be used to know if this machine is suitable or not when executing a process.x86,x64,arm,arm64: Supported architectures.ubuntu24,ubuntu22,ubuntu20,ubuntu18,ubuntu16,ubuntu14,ubuntu12: Linux version.sequoia,sonoma,ventura,monterey,bigsur,catalina,mojave,high_sierra,sierra,el_capitan,yosemite,mavericks,mountain_lion,lion,snow_leopard: MacOS/MacOSX version.msvc2022,msvc2019,msvc2017,msvc2015,msvc2013,msvc2012,msvc2010: Supported versions of Microsoft Visual C++, required for the use of the "Ninja" generator on Windows.
3. A real network
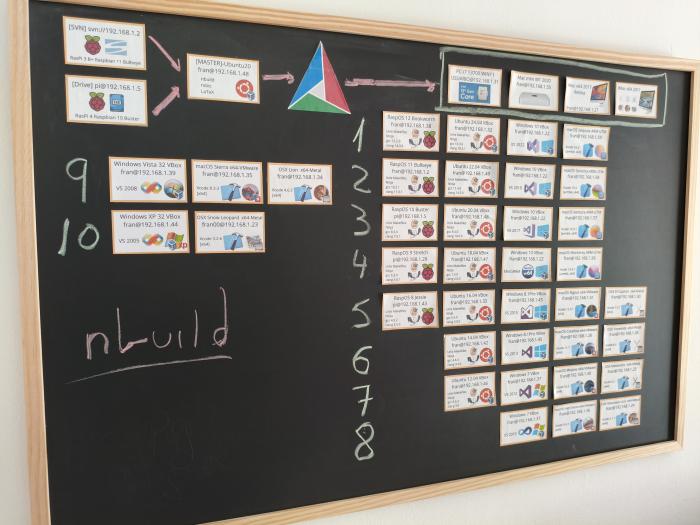
In (Figure 3) we have all the nodes, both physical and virtual used daily to generate the NAppGUI-SDK project.


