

Generators, compilers and IDEs
This page has been automatically translated using the Google Translate API services. We are working on improving texts. Thank you for your understanding and patience.
It's hard to write software that runs correctly and efficiently. So once a program works in one environment, you don't want to repeat much of the effort if you move it to a different compiler or processor or operating system. Ideally, it should need no changes whatsoever. Kernighan & Pike - The Practice of Programming.
1. Portability concept
We understand by portability (Figure 1) the ability to compile and debug our programs on platforms other than those on which they were written, without having to touch a single line of code. We understand by platform the combination of a compiler and a CPU architecture. For example, v143_x64 refers to Visual Studio 2022 and Intel 64bits. We understand by configuration the set of flags and compiler options that have been used to generate the binaries.
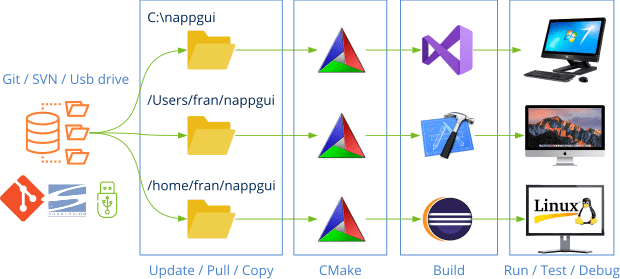
- Working copy: A copy of the project's source code must exist on each machine. Normally this will be done through a version control system (SVN, Git, etc).
- CMake: will create or update a build project from source code using
/src/CMakeLists.txtand the scripts in the/prjdirectory. This will be done fully automatically. - Compile: Using Visual Studio, Xcode or GCC, the solution will be compiled and the libraries and executables included in it will be generated.
- Run/Debug: The binaries can now be run and debugged on the target platform.
2. CMake Generators
We remember that a compiler acts on a single source file at a time. When we compile a .c or .cpp, an object file (.o, .obj) is generated that contains the binary code of said source. But any project of a certain size contains hundreds of files, organized in libraries that must be linked to create the final executable(s). We know as build system the tool that orchestrates the compilation of all the project files, in order to make it as fast and efficient as possible. We can say that CMake is a meta-build system, capable of generating build projects for different tools (Figure 2). To do this we will use the -G option.
|
|
cmake -G "Visual Studio 17 2022" cmake -G Ninja cmake -G Xcode cmake -G "Unix Makefiles" |
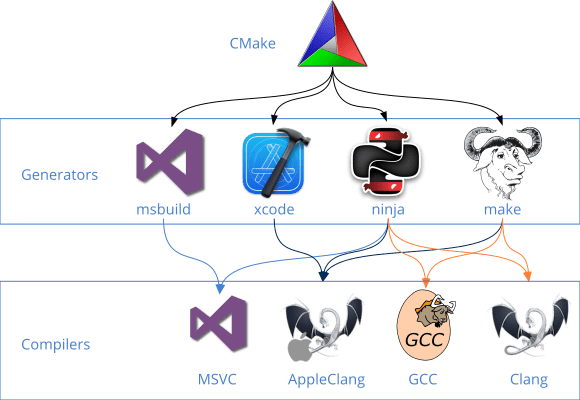
Not all generators work on all platforms, and there is usually no strict binding between generator and compiler. For example, the Ninja generator can use the MSVC, GCC and Clang compilers underneath. The most important thing we must remember is that CMake, through the CMakeLists.txt of the project, unifies the entire build process, making it transparent for the developer, regardless of the generator, compiler and platform.
3. Visual Studio
Visual Studio is the development environment par excellence for Windows. In the same package it integrates the build system (msbuild), the compiler (MSVC) and the editor (IDE). We can use any version, starting from 2005, to compile NAppGUI on Windows (Table 1). As we already saw in Quick start the first thing we have to do is launch CMake on the source code:
| Compiler | Platform | Minimum O.S. | |
 |
Visual Studio 2022 | v143_x64 (x86) | Vista |
 |
Visual Studio 2019 | v142_x64 (x86) | Vista |
 |
Visual Studio 2017 | v141_x64 (x86) | Vista |
 |
Visual Studio 2015 | v140_x64 (x86) | Vista |
 |
Visual Studio 2013 | v120_x64 (x86) | Vista |
 |
Visual Studio 2012 | v110_x64 (x86) | Vista |
 |
Visual Studio 2010 | v100_x64 (x86) | XP |
 |
Visual Studio 2008 | v90_x64 (x86) | XP |
 |
Visual Studio 2005 | v80_x64 (x86) | XP |
|
|
cmake -G "Visual Studio 16 2019" -A x64 -T v120 -S . -B build |
-Gis the version of Visual Studio (generator).-Ais Intel 32 or 64 bit architecture:-Tis the Platform Toolset. If you omit this parameter, the last one supported by the compiler will be taken.-S: Path where theCMakeLists.txtis located.-B: Path where the build projects, binaries and temporary files will be generated.-DNAPPGUI_DEMO=NO: Avoid generating the example applications. Only the SDK will be compiled.
|
|
-G "Visual Studio 17 2022" -G "Visual Studio 16 2019" -G "Visual Studio 15 2017" -G "Visual Studio 14 2015" -G "Visual Studio 12 2013" -G "Visual Studio 11 2012" -G "Visual Studio 10 2010" -G "Visual Studio 9 2008" -G "Visual Studio 8 2005" |
|
|
-A x64 -A Win32 |
|
|
-T v143 -T v142 -T v141 -T v140 -T v120 -T v110 // For XP compatibility -T v141_xp -T v140_xp -T v120_xp -T v110_xp -T v100 -T v90 -T v80 |
Support for Visual Studio 8 2005 was removed in CMake 3.12. You must use an older version of CMake if you are still using VS2005. NAppGUI does NOT work with versions prior to VS2005.
NAppGUI does not offer support for non-x86, x64 architectures on Windows: ARM, Itanium, etc.
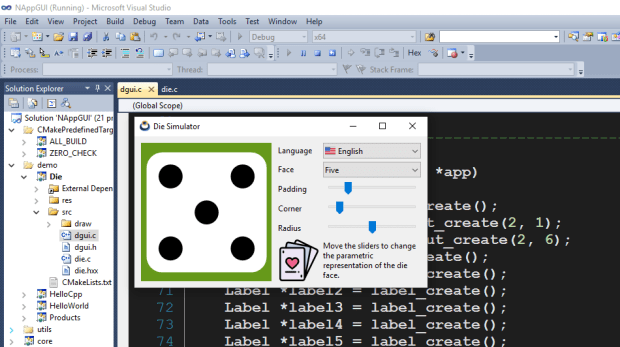
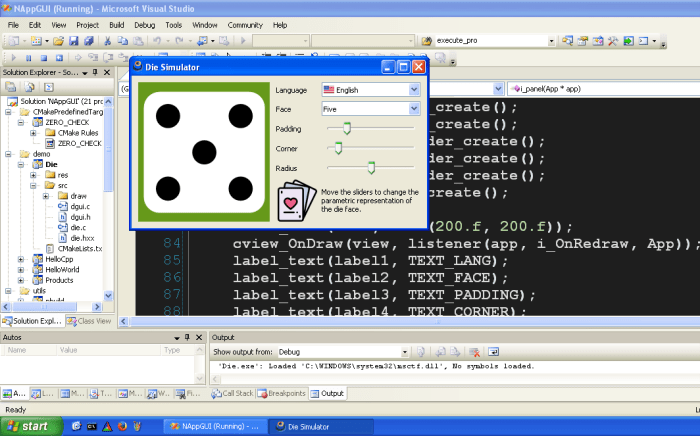
After running CMake, a VisualStudio solution will appear in the /build folder, NAppGUI.sln or whatever name is configured in project(NAppGUI) of the CMakeLists.txt. Open that solution and from Visual Studio, Build->Build Solution to compile Debug->Start Debugging to debug (Figure 3).
To change the version of Visual Studio, select another builder in CMake -G "Visual Studio 15 2017", close and reopen the solution.
As we already saw in Build NAppGUI, if your intention is only to compile the SDK, you do not need to open the solution in the editor. You can compile it directly from the command line.
|
|
cmake -G "Visual Studio 17 2022" -S . -B build -DNAPPGUI_DEMO=NO cmake --build build --config Release -j 4 |
3.1. Platform toolset
Starting with Visual Studio 2010, there is a decoupling between the editor and the compiler. The term Plaform Toolset identifies the compiler itself, which can continue to be used with more modern IDEs. If we do not specify anything, CMake will use the default toolset included in each version of VS, but it can be changed using the -T parameter of CMake (Table 2). For example, we can combine Visual Studio 15 2017 with the VS2013 toolset for Windows XP v120_xp:
|
|
cmake -G "Visual Studio 15 2017" -A Win32 -T v120_xp -S . -B build |
| Toolset (-T) | VS version |
| v143 | Visual Studio 2022 |
| v142 | Visual Studio 2019 |
| v141 | Visual Studio 2017 |
| v141_xp | Visual Studio 2017 (con soporte XP) |
| v140 | Visual Studio 2015 |
| v140_xp | Visual Studio 2015 (con soporte XP) |
| v120 | Visual Studio 2013 |
| v120_xp | Visual Studio 2013 (con soporte XP) |
| v110 | Visual Studio 2012 |
| v110_xp | Visual Studio 2012 (con soporte XP) |
| v100 | Visual Studio 2010 |
| v90 | Visual Studio 2008 |
| v80 | Visual Studio 2005 |
You need to have each version of Visual Studio installed to use its toolset. There are "light" versions that install the build tools without the development environment.
3.2. Visual C++ Redistributable
By default, Visual Studio dynamically links the functions of the C standard library, which means that the .exe may not work on machines that do not have the VC++ DLLs (Figure 4). This forces applications to include a copy of MSVCRT.dll, VCRUNTIME.dll, ... or to install the famous Visual C++ Redistributable packages. to ensure that the application can run smoothly.

NAppGUI uses a reduced set of the C library, since it directly accesses the Windows API whenever possible. For this reason, all applications created with NAppGUI perform a static link (option /MT) of the necessary functions of the stdlib, avoiding dependencies at the cost of slightly increasing (a few Kb) the size of the executable. final. This ensures that applications will run smoothly on all Windows machines without the need for additional DLLs and without having to install the VC++ Redistributable.
NAppGUI applications do not require the Visual C++ Redistributable. They also do not use the MFC "Microsoft Foundation Classes" or the .NET platform.
3.3. WindowsXP support
Starting with VS2012, the Platform Toolset generates executables that are not compatible with WindowsXP. If we want our applications to run on this system, we must select the alternative toolset ending in _xp: v141_xp, v140_xp, v120_xp, v110_xp. Or v100, v90 or v80 (VS2010, 2008, 2005), which do directly support XP (Figure 5) .
WindowsXP support has been permanently removed in Visual Studio 2019. There is no Platform Toolset v142_xp.
Cannot create applications with NAppGUI that work on Windows prior to XP.
3.4. SSE support
With the Pentium III, Intel introduced an additional instruction set for floating point operations called SSE Streaming SIMD Extensions. This allows you to optimize mathematical calculations at the cost of losing compatibility, since applications that use SSE will not work on Pentium II or earlier models. In NAppGUI the v80_x86 and v90_x86 toolsets have been reserved for building applications compatible with older (Table 3) processors. Starting with v100_x86, SSE2 will be used in all toolsets.
| Toolset | SSE | Minimum CPU |
| v80_x86 | x87 (no SSE) | Pentium II/AMD K6 |
| v90_x86 | SSE | Pentium III/AMD Duron |
| v100_x86 | SSE2 | Pentium IV/AMD Sempron |
| v110_x86 | SSE2 | Pentium IV/AMD Sempron |
| ... | SSE2 | ... |
SSE support is only disabled on 32-bit (x86) architectures. All 64-bit (x64) CPUs incorporate SSE2.
4. MinGW
MinGW-w64 is a project created to support GCC/Clang compilers on Windows systems. It forked in 2007 from the original mingw.org. In addition to the compilers, it provides Win32 headers and libraries, allowing you to create native Windows applications, without having to install VisualStudio. Starting with version 1.4.2, NAppGUI provides support for this environment.
4.1. MinGW-GCC
To compile NAppGUI with MinGW-GCC (Table 4) we will:
|
|
cmake -G "MinGW Makefiles" -S . -B build -DCMAKE_C_COMPILER=gcc -DCMAKE_CXX_COMPILER=g++ -DCMAKE_BUILD_TYPE=Release cmake --build build -j 4 |
-DCMAKE_BUILD_TYPE=[Debug|Release]: Unlike VisualStudio, MinGW is based on themaketool which is mono-configuration. We must indicate it at generation time and not at compilation time.
| Compiler | Platform | Minimum O.S. | |
 |
MinGW-GCC 13 | mwgcc13_2_0_x64 | Vista |
Since IDE projects are not generated, we recommend using Visual Studio Code or Eclipse CDT to debug projects generated with MinGW.
4.2. MinGW-Clang
If we want to use the Clang compiler (Table 5) instead of GCC:
|
|
cmake -G "MinGW Makefiles" -S . -B build -DCMAKE_C_COMPILER=clang -DCMAKE_CXX_COMPILER=clang++ -DCMAKE_BUILD_TYPE=Release cmake --build build -j 4 |
| Compiler | Platform | Minimum O.S. | |
|
MinGW-Clang 18 | mwclang18_1_4_x64 | Vista |
4.3. MSYS2
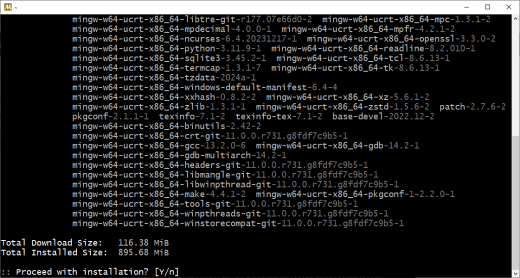
Although there are different ways to install MinGW, the most direct, updated and recommended is to do it through an MSYS2 console. This project recreates a Unix terminal on Windows, providing the typical tools (grep, sed, curl, ...) and commands (ls, cp, rm, cat, ...). MSYS2 also includes the pacman package manager.
- Download MSYS2 from https://www.msys2.org/. The typical installation is in
C:\msys64. - Open an MSYS2 terminal (Figure 6) and type:
- Edit the Windows environment variables by adding these paths to
PATH: - Open a
CMDterminal and check that the compilers work:
|
|
# GCC install pacman -S --needed base-devel mingw-w64-ucrt-x86_64-toolchain # Clang install pacman -S mingw-w64-x86_64-clang |
|
|
C:\msys64\mingw64\bin C:\msys64\ucrt64\bin |
|
|
C:\>gcc --version gcc (Rev6, Built by MSYS2 project) 13.2.0 C:\>clang --version clang version 18.1.4 C:\>mingw32-make -version GNU Make 4.4.1 |
Lastly, you may want to compile via the MSYS2 console instead of Windows CMD. Then:
|
|
# GCC compiler under MSYS cmake -G "MSYS Makefiles" -S . -B build -DCMAKE_C_COMPILER=gcc -DCMAKE_CXX_COMPILER=g++ -DCMAKE_BUILD_TYPE=Release # Clang compiler under MSYS cmake -G "MSYS Makefiles" -S . -B build -DCMAKE_C_COMPILER=clang -DCMAKE_CXX_COMPILER=clang++ -DCMAKE_BUILD_TYPE=Release # Build cmake --build build -j 4 |
Both MinGW and MSYS use the same native Windows versions of GCC and Clang. The difference between both generators lies in the utilities that orchestrate the compilation: Windows-like (MinGW) and Unix-like (MSYS).
5. Xcode
To compile for Apple iMac, macBook and macMini we will need CMake and Xcode starting with version 3.2.6 (Table 6). NAppGUI allows you to build applications that work on MacOSX 10.6 Snow Leopard and later:
| Compiler | Minimum O.S. | Platform | |
 |
Xcode 15.0.1 | Sonoma | sdk14_0_x64 (arm) |
 |
Xcode 14.3.1 | Ventura | sdk13_6_x64 (arm) |
 |
Xcode 13.4.1 | Monterey | sdk12_3_x64 (arm) |
 |
Xcode 12.5.1 | Big Sur | sdk11_5_x64 (arm) |
 |
Xcode 11.7 | Catalina | sdk10_15_x64 |
 |
Xcode 10.3 | Mojave | sdk10_14_x64 |
 |
Xcode 9.4.1 | High Sierra | sdk10_13_x64 |
 |
Xcode 8.3.3 | Sierra | sdk10_12_x64 |
 |
Xcode 7.3.1 | El Capitan | sdk10_11_x64 |
 |
Xcode 6.4 | Yosemite | sdk10_10_x64 |
 |
Xcode 6.2 | Mavericks | sdk10_9_x64 |
 |
Xcode 5.1.1 | Mountain Lion | sdk10_8_x64 |
 |
Xcode 4.6.3 | Lion | sdk10_7_x64 |
 |
Xcode 3.2.6 | Snow Leopard | sdk10_6_x64 (x86) |
|
|
cmake -G Xcode -DCMAKE_DEPLOYMENT_TARGET=11.0 -DCMAKE_ARCHITECTURE=arm64 -S . -B build |
-GalwaysXcode. Usexcode-selectto toggle if you have multiple versions installed.-DCMAKE_DEPLOYMENT_TARGET. Minimum operating system that will be supported. Omitting it will set the Base SDK included in the Xcode version.-DCMAKE_ARCHITECTURE.arm64,x64,i386. Thearm64architecture is included starting with SDK 11.0 Big Sur.i386was deprecated in macOS 10.13 High Sierra.
|
|
-DCMAKE_DEPLOYMENT_TARGET=14.0 // Sonoma -DCMAKE_DEPLOYMENT_TARGET=13.6 // Ventura -DCMAKE_DEPLOYMENT_TARGET=13.5 // Ventura -DCMAKE_DEPLOYMENT_TARGET=13.4 // Ventura -DCMAKE_DEPLOYMENT_TARGET=13.3 // Ventura -DCMAKE_DEPLOYMENT_TARGET=13.2 // Ventura -DCMAKE_DEPLOYMENT_TARGET=13.1 // Ventura -DCMAKE_DEPLOYMENT_TARGET=13.0 // Ventura -DCMAKE_DEPLOYMENT_TARGET=12.4 // Monterey -DCMAKE_DEPLOYMENT_TARGET=12.3 // Monterey -DCMAKE_DEPLOYMENT_TARGET=12.2 // Monterey -DCMAKE_DEPLOYMENT_TARGET=12.0 // Monterey -DCMAKE_DEPLOYMENT_TARGET=11.5 // Big Sur -DCMAKE_DEPLOYMENT_TARGET=11.4 // Big Sur -DCMAKE_DEPLOYMENT_TARGET=11.3 // Big Sur -DCMAKE_DEPLOYMENT_TARGET=11.2 // Big Sur -DCMAKE_DEPLOYMENT_TARGET=11.1 // Big Sur -DCMAKE_DEPLOYMENT_TARGET=11.0 // Big Sur -DCMAKE_DEPLOYMENT_TARGET=10.15 // Catalina -DCMAKE_DEPLOYMENT_TARGET=10.14 // Mojave -DCMAKE_DEPLOYMENT_TARGET=10.13 // High Sierra -DCMAKE_DEPLOYMENT_TARGET=10.12 // Sierra -DCMAKE_DEPLOYMENT_TARGET=10.11 // El Capitan -DCMAKE_DEPLOYMENT_TARGET=10.10 // Yosemite -DCMAKE_DEPLOYMENT_TARGET=10.9 // Mavericks -DCMAKE_DEPLOYMENT_TARGET=10.8 // Mountain Lion -DCMAKE_DEPLOYMENT_TARGET=10.7 // Lion -DCMAKE_DEPLOYMENT_TARGET=10.6 // Snow Leopard |
|
|
-DCMAKE_ARCHITECTURE=arm64 -DCMAKE_ARCHITECTURE=x64 -DCMAKE_ARCHITECTURE=i386 |
NAppGUI does not support the creation of Apple's Fat binaries. You must indicate a single value in this field.
-S: Path where theCMakeLists.txtis located.-B: Path where the build projects, binaries and temporary files will be generated.-DNAPPGUI_DEMO=NO: Avoid generating the example applications. Only the SDK will be compiled.
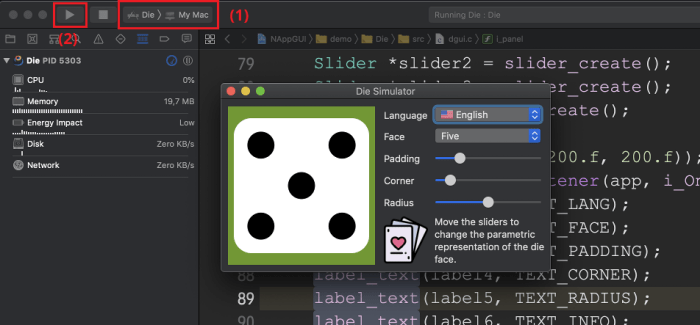
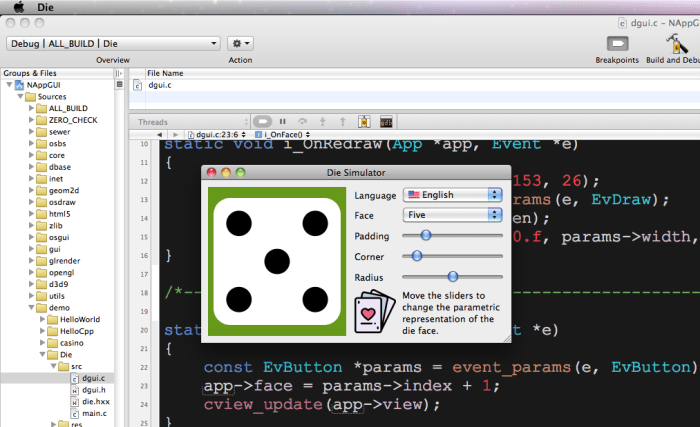
After running CMake, an Xcode solution will appear in the /build folder, NAppGUI.xcodeproj or whatever name is configured in project(NAppGUI) of the CMakeLists.txt. Opening the Xcode solution, we see the different projects that make it up, including Die and Dice. Select Die in the top left dropdown and then click Play or Product->Run (Figure 7). This will compile the program and launch it in debug mode, where we can set breakpoints to inspect the stack and the values of the variables.
5.1. Base SDK and Deployment Target
Every year, Apple releases a new version of macOS, accompanied by a new SDK and an update to Xcode that includes the SDK. This is called the Base SDK.
Base SDK is the version included in each new major version of Xcode, which matches the latest version of the macOS system released on the market.
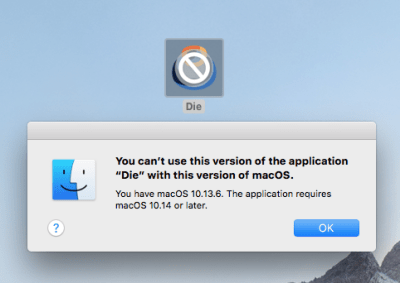
Apple has a much more restrictive policy than Microsoft regarding the compatibility of applications with previous versions of the operating system. By default, a program compiled with SDK 10.14 (macOS Mojave) will not work on the immediately preceding macOS High Sierra (Figure 8).
To avoid this problem, and for applications to work on older macOS, there is the Deployment Target parameter. Using it will trigger a macro that will override the new features of the Base SDK. This will allow the program to run on older versions at the cost, of course, of not having access to the latest iMac features. You will be able to select the Deployment Target required by your project through the -DCMAKE_DEPLOYMENT_TARGET parameter, as we have already seen in the previous section.
Xcode 14 deprecates Deployment Targets below 10.13 (Figure 9). Use Xcode 13 if you want compatibility with Mac OSX 10.12 Sierra and earlier.

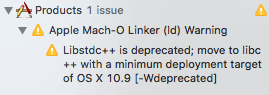
Xcode 8 deprecates Deployment Targets below 10.9 (Figure 10). Use Xcode 7 if you want compatibility with Mac OSX 10.8 Mountain Lion and earlier.
5.2. xcode-select
We have already seen that CMake only offers one generator for Xcode (-G "Xcode"), although it is possible to have multiple versions installed on the same machine, each within its own bundle Xcode.app. There will always be a default Xcode on the system (the most recent one) but it can be changed using the xcode-select utility:
|
|
xcode-select -p /Applications/Xcode.app/Contents/Developer |
|
|
sudo xcode-select -s /Applications/Xcode8.app/Contents/Developer |
|
|
sudo xcode-select -r |
You will need to run cmake -G "Xcode"... again each time you use xcode-select for your project to update the compiler change.
5.3. macOS ARM
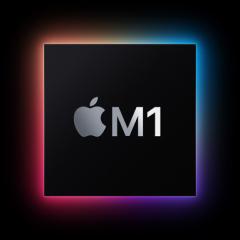
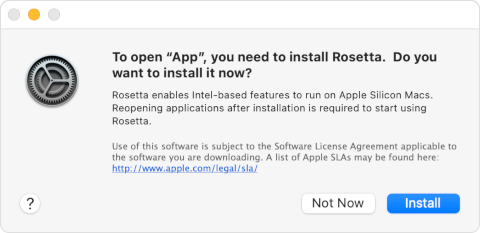
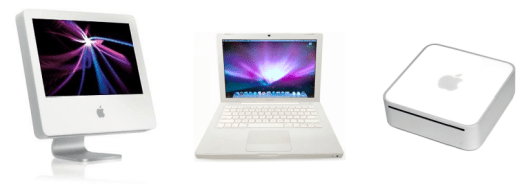
In November 2020 Apple launches its new line of desktop and laptop computers (iMac, macBook and macMini) based on the Apple M1 processor with ARM (Figure 11) architecture. Although they are capable of running programs compiled for Intel x64 using the Rosetta 2 (Figure 12) program, the ideal would be to compile our applications for the new architecture in order to optimize the executables as much as possible.
NAppGUI supports building for the Apple ARM architecture. You just need to include the -DCMAKE_ARCHITECTURE=arm64 option in CMake, as we saw in the previous section.
You can compile the M1 architecture from Intel x64 machines, but you won't be able to debug the executables.
M1 architecture is only available for Big Sur system (macOS 11.0) and later.
5.4. macOS 32bits
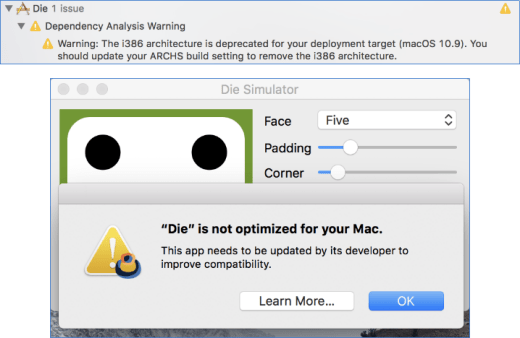
Since the macOS High Sierra release, Apple has declared the 32-bit architecture obsolete, issuing notices to users in the case of detecting i386 (Figure 13) executables. As of Xcode 10, (Figure 14) cannot be compiled on this architecture.

Support for 32bit applications is gone for good in macOS Catalina, which only allows running 64bit applications.
This makes some sense since all Intel-based iMac models feature 64-bit processors, except for a few 2006 models in white polycarbonate that mounted the 32-bit Intel Core Duo (Figure 15) . These iMacs supported Mac OSX 10.6 Snow Leopard at most, with a 64-bit CPU being a fundamental requirement as of 10.7 Lion. To compile without problems in 32bits you must use, at most, Xcode 6 (Figure 16).
6. macOS Make
The Unix Make utility is included as part of the Xcode build tools. Therefore, we can use it as a generator on macOS, if we can do without the Xcode projects. Make is mono-configuration, so we must indicate the configuration type during generation.
|
|
cmake -G "Unix Makefiles" -S . -B build -DNAPPGUI_DEMO=NO -DCMAKE_BUILD_TYPE=Release cmake --build build |
7. Linux GCC
For Linux versions, we will use the gcc (Table 7) compiler and the make tool to generate the binaries, but there is no "official" development environment as it happens in Windows and macOS. To carry out an elementary configuration of our equipment, type the following commands in a terminal:
1 2 3 4 5 6 7 8 9 10 11 12 13 14 15 16 17 18 19 |
// Development tools sudo apt-get install build-essential sudo apt-get install git sudo apt-get install cmake // Development libraries sudo apt-get install libgtk-3-dev sudo apt-get install libglu1-mesa-dev freeglut3-dev mesa-common-dev sudo apt-get install libcurl4-openssl-dev // GTK Inspector (Ctrl+D when debugging) gsettings set org.gtk.Settings.Debug enable-inspector-keybinding true // Check system libraries version pkg-config --modversion gtk+-3.0 3.24.20 pkg-config --modversion libcurl 7.68.0 |
| Minimum O.S. | Compiler | Toolkit | Platform | |
| Ubuntu 24.04 LTS | GCC 13.2.0 | GTK 3.24.41 | gcc13_2_0_gtk3_x64 | |
| Ubuntu 22.04 LTS | GCC 11.2.0 | GTK 3.24.33 | gcc11_2_0_gtk3_x64 | |
| Ubuntu 20.04 LTS | GCC 9.4.0 | GTK 3.24.20 | gcc9_4_0_gtk3_x64 | |
| Ubuntu 18.04 LTS | GCC 7.5.0 | GTK 3.22.30 | gcc7_5_0_gtk3_x64 | |
| Ubuntu 16.04 LTS | GCC 5.4.0 | GTK 3.18.9 | gcc5_4_0_gtk3_x64 (x86) | |
| Ubuntu 14.04 LTS | GCC 4.8.4 | GTK 3.10.8 | gcc4_8_4_gtk3_x64 (x86) | |
| Ubuntu 12.04 LTS | GCC 4.6.3 | GTK 3.4.2 | gcc4_6_3_gtk3_x64 (x86) | |
 |
Raspbian 11 Bullseye | GCC 10.2.1 | GTK 3.24.24 | gcc10_gtk3_arm64 |
|
Raspbian 10 Buster | GCC 8.3.0 | GTK 3.24.5 | gcc8_gtk3_arm |
|
Raspbian 9.1 Strech | GCC 6.3.0 | GTK 3.22.11 | gcc6_gtk3_arm |
|
Raspbian 8.0 Jessie | GCC 4.9.2 | GTK 3.14.5 | gcc4_9_gtk3_arm |
Just like we did on Windows and macOS, we run cmake to generate the build project:
|
|
cmake -G "Unix Makefiles" -DCMAKE_C_COMPILER=gcc -DCMAKE_CXX_COMPILER=g++ -DCMAKE_BUILD_TYPE=Debug -DCMAKE_ARCHITECTURE=x64 -DCMAKE_TOOLKIT=GTK3 -S . -B build |
-Galways"Unix Makefiles". Additionally, you can create projects for the main IDEs available in Linux:DCMAKE_C_COMPILER. C compiler. By default,gcc.DCMAKE_CXX_COMPILER. C++ compiler. Default,g++.-DCMAKE_BUILD_TYPE. Unlike Visual Studio and Xcode, Make does not allow the creation of multi-configuration projects. It must be indicated at the time of generation:-DCMAKE_ARCHITECTURE.x64,i386,arm,arm64. Cross-compiling is not allowed on Linux. We must select the same architecture as the host machine. This parameter can be omitted, it will be set automatically.-DCMAKE_TOOLKIT. As of today, the only option available isGTK3, since NAppGUI does not support other graphical toolkits. This parameter can be omitted, it will be set automatically.-S: Path where theCMakeLists.txtis located.-B: Path where the build projects, binaries and temporary files will be generated.-DNAPPGUI_DEMO=NO: Avoid generating the example applications. Only the SDK will be compiled.
|
|
-G "Unix Makefiles" -G "CodeBlocks - Unix Makefiles" -G "CodeLite - Unix Makefiles" -G "Sublime Text 2 - Unix Makefiles" -G "Kate - Unix Makefiles" -G "Eclipse CDT4 - Unix Makefiles" |
|
|
-DCMAKE_BUILD_TYPE=Debug -DCMAKE_BUILD_TYPE=Release -DCMAKE_BUILD_TYPE=ReleaseWithAssert |
|
|
-DCMAKE_ARCHITECTURE=x64 // Only in Linux Intel 64bits hosts -DCMAKE_ARCHITECTURE=i386 // Only in Linux Intel 32bits hosts -DCMAKE_ARCHITECTURE=arm // Only in Linux ARM 32bits hosts -DCMAKE_ARCHITECTURE=arm64 // Only in Linux ARM 64bits hosts |
|
|
-DCMAKE_TOOLKIT=GTK3 |
After executing cmake we will have, in the /build folder, a series of Makefiles ready to compile the project.
|
|
cmake --build build -j 4 ... [ 93%] Linking CXX executable ../../Debug/bin/DrawBig [ 93%] Linking CXX executable ../../Debug/bin/GuiHello [ 93%] Built target DrawBig [ 94%] Building C object howto/drawhello/CMakeFiles/DrawHello.dir/resgen/res_drawhello.c.o [ 94%] Linking CXX executable ../../Debug/bin/Col2dHello [ 98%] Built target GuiHello [ 98%] Building C object howto/drawimg/CMakeFiles/DrawImg.dir/resgen/res_drawimg.c.o [ 98%] Linking CXX executable ../../Debug/bin/UrlImg [ 98%] Linking CXX executable ../../Debug/bin/DrawHello [ 98%] Built target Col2dHello [ 98%] Linking CXX executable ../../Debug/bin/ColorView [ 98%] Built target UrlImg [ 98%] Built target DrawHello [ 99%] Linking CXX executable ../../Debug/bin/DrawImg [100%] Built target ColorView [100%] Built target DrawImg |
Once the compilation is finished, we can launch the executables directly from the terminal:
|
|
./build/demo/die/Debug/Die |
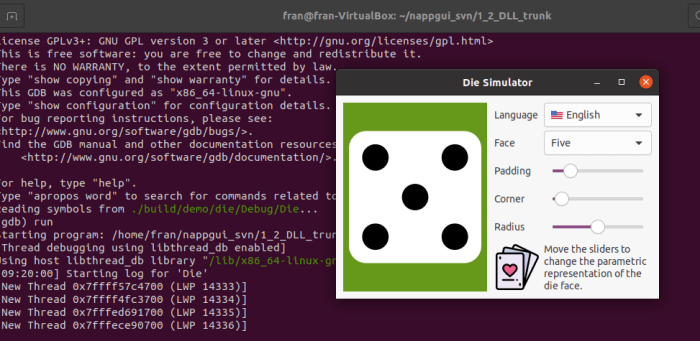
If you're fairly comfortable with gdb, you can try debugging the code directly from the (Figure 17) terminal. Later we will see how to do it using Eclipse and Visual Studio Code.
|
|
gdb ./build/demo/die/Debug/Die (gdb) run ... |
To build the example applications, you must ignore the -DNAPPGUI_DEMO=NO option in CMake.
7.1. Multiple versions of GCC
Although every Linux distribution comes with a "canonical" version of GCC, it is possible to have several installed on the same machine and switch between them much like we did on macOS with xcode-select. To do this we will use the Linux update-alternatives command. We assume that we are on Ubuntu 18.04 LTS:
|
|
gcc --version gcc 7.5.0 |
|
|
sudo apt-get install gcc-6 g++-6 |
|
|
sudo update-alternatives --install /usr/bin/gcc gcc /usr/bin/gcc-7 60 --slave /usr/bin/g++ g++ /usr/bin/g++-7 sudo update-alternatives --install /usr/bin/gcc gcc /usr/bin/gcc-6 50 --slave /usr/bin/g++ g++ /usr/bin/g++-6 |
|
|
sudo update-alternatives --set gcc /usr/bin/gcc-6 gcc --version gcc 6.5.0 g++ --version g++ 6.5.0 |
|
|
sudo update-alternatives --auto gcc gcc --version gcc 7.5.0 g++ --version g++ 7.5.0 |
7.2. Linux 32bits
To compile 32bit applications from a 64bit Ubuntu system it is necessary to install the multilib package:
|
|
sudo apt-get install gcc-multilib |
But there are currently problems with cross-compiling that includes the GTK+ library, so it won't be possible to use the same machine development to build on both architectures, just like it does on Windows. Console applications or libraries that do not access GTK can be compiled in 32bit from a 64bit computer.
It is not possible to compile in 32bits from a 64bit Ubuntu system applications that use GTK+3. You must use a 32-bit Linux system for this.
7.3. Linux ARM
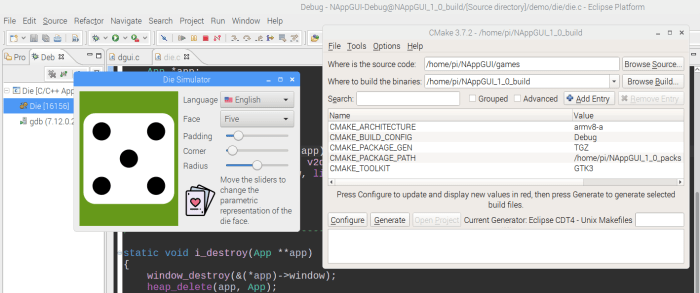
The ARM Advanced RISC Machine architecture is the predominant one in the market for embedded devices such as smartphones and tablets. Currently, NAppGUI does not offer support for the development of iOS/Android mobile applications, but it does support other types of boards that support "desktop" versions of Linux ARM, such as the Raspberry PI. To port our code to the Raspberry Pi we must follow the same steps as in Ubuntu Linux (Figure 18). Both distributions are based on Debian, so GCC, CMake and Make are available directly via apt-get.
8. Linux Clang
GCC is the default compiler that is installed with the build-essential package. However, we can use Clang if we prefer (Table 8). The first thing is to install the compiler:
|
|
sudo apt-get install clang clang --version clang version 10.0.0-4ubuntu1 |
| Minimum O.S. | Compiler | Toolkit | Platform | |
| Ubuntu 24.04 LTS | Clang 18.1.3 | GTK 3.24.41 | clang18_1_3_gtk3_x64 | |
| Ubuntu 22.04 LTS | Clang 14.0.0 | GTK 3.24.33 | clang14_0_0_gtk3_x64 | |
| Ubuntu 20.04 LTS | Clang 10.0.0 | GTK 3.24.20 | clang10_0_0_gtk3_x64 | |
| Ubuntu 18.04 LTS | Clang 6.0.0 | GTK 3.22.30 | clang6_0_0_gtk3_x64 | |
| Ubuntu 16.04 LTS | Clang 3.8.0 | GTK 3.18.9 | clang3_8_0_gtk3_x64 (x86) | |
| Ubuntu 14.04 LTS | Clang 3.4.0 | GTK 3.10.8 | clang3_4_0_gtk3_x64 (x86) | |
| Ubuntu 12.04 LTS | Clang 3.0.0 | GTK 3.4.2 | clang3_0_0_gtk3_x64 (x86) |
To use Clang, we just change the name of the compiler when generating the compilation project:
|
|
cmake -G "Unix Makefiles" -DCMAKE_C_COMPILER=clang -DCMAKE_CXX_COMPILER=clang++ -DCMAKE_BUILD_TYPE=Debug -DCMAKE_ARCHITECTURE=x64 -DCMAKE_TOOLKIT=GTK3 -S . -B build |
9. Linux GTK
Unlike Windows and macOS, Linux supports a multitude of desktop environments based on different libraries (or toolkits), GTK and Qt being the two most famous. NAppGUI uses GTK+3 for the graphical part since it is the base of the Gnome, Xfce, Lxde, etc, (Table 9) environments present in many of the most widespread distributions. GTK+3 will be present naturally in all of them, with no other additional dependencies being necessary. Of course, to compile under GTK+3 we will have to install the developer version, as we saw previously.
| Environment | Distributions | |
 |
Gnome | Ubuntu, Debian, Fedora, Red Hat, CentOS, Manjaro, Suse, Arch, ... |
 |
Xfce | Xubuntu, Debian, Fedora, Manjaro, ... |
 |
Lxde | Lubuntu, Raspbian, Debian, Fedora, Mandriva, ... |
 |
Cinnamon | Mint, Debian, Ubuntu, Fedora, OpenSuse, ... |
 |
Mate | Ubuntu Mate, Mint, Debian, Fedora, OpenSuse, ... |
 |
Pantheon | Elementary OS |
 |
Sugar |
10. Ninja
The Ninja generator allows for faster compilations than Visual Studio, Xcode or Make, in exchange for losing the *.sln, *.vcxproj or *.xcodeproj projects that are very useful for debugging from the IDE. It is usually used in continuous integration systems where speed prevails in favor of versatility.
To install Ninja on Windows, we download it from Ninja, copy ninja.exe to any system folder and make it accessible through the PATH variable.
|
|
ninja --version 1.11.1 |
On macOS, we will install it using brew:
|
|
brew install ninja ninja --version 1.11.1 |
And in Linux from apt-get:
|
|
sudo apt-get install ninja-build ninja --version 1.10.1 |
Using Ninja is exactly the same as in previous cases. We will only change the name of the generator in CMake.
|
|
cmake -G Ninja -S . -B build -DCMAKE_C_COMPILER=gcc -DCMAKE_CXX_COMPILER=g++ -DCMAKE_BUILD_TYPE=Release cmake --build build |
We can also use the multi-configuration version of Ninja:
|
|
cmake -G "Ninja Multi-Config" -S . -B build -DCMAKE_C_COMPILER=gcc -DCMAKE_CXX_COMPILER=g++ -DCMAKE_BUILD_TYPE=Release cmake --build build --config Release |
CMake supports "Ninja Multi-Config" as of version 3.17.
-DCMAKE_C_COMPILER/DCMAKE_CXX_COMPILER: Ninja will use any C/C++ compiler we have installed.gcc/g++,clang/clang++orcl/cl(MSVC).
On Windows, the MVSC compiler, in principle, is not accessible directly from the command line. To make it accessible we have two ways:
- Use the
Developer Command Prompt 2022console (or whatever version you choose). This terminal knows the location of the build tools. - Set the environment variables using the script
vcvarsall.bat [Win32|x64]. A possible location will be"C:\Program Files\Microsoft Visual Studio\2022\Community\VC\Auxiliary\Build\vcvarsall.bat" x64, but it will change depending on the version of Visual Studio we have installed.
11. Configurations
A NAppGUI application can be compiled in three different configurations, depending on the level of debugging we need.
- Debug: Includes debugging information in the binaries and does not perform code optimizations. It is the developer version.
- Release: Remove debug information and perform all possible optimizations. It is the version for the user.
- ReleaseWithAssert: It is the Release version, but leaving the Asserts statements active. It is aimed at the end user, but in cases where it is necessary to obtain detailed information on possible anomalies, at the cost of a decrease in the overall performance of the program.
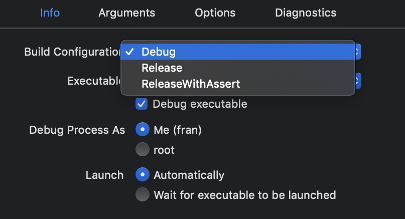
Both Visual Studio and Xcode are multi-configuration environments, that is, we can switch between one and the other directly from the editor itself. In Visual Studio we have a dropdown at the top of the (Figure 19) editor.

In Xcode it is a bit more hidden. We do Product->Scheme->Edit Scheme. A popup window will appear. Select Run->Info->Build Configuration (Figure 20).
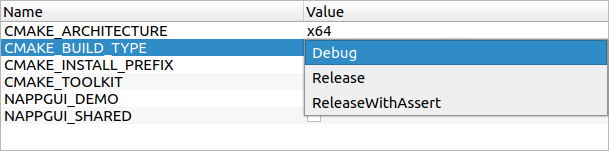
Unfortunately, Unix make does not support multiple configurations. This forces us to pass the CMAKE_BUILD_TYPE (Figure 21) to set the configuration in CMake before generating the build scripts.
|
|
cmake -G Ninja -S . -B build DCMAKE_BUILD_TYPE=Release cmake --build build |
|
|
cmake -G Xcode -S . -B build cmake --build build --config Release |
12. Eclipse CDT
Generators based on Ninja and Unix Makefiles are terminal-oriented, while those based on Visual Studio and Xcode generate an IDE project. Working directly with the terminal gives us great flexibility when configuring our own tools. Going back to the console and typing cmake --build build will recompile everything you need. Now, using GDB directly will be quite tedious, so it will be very useful to have alternative IDEs to debug projects based on these generators. In the development of NAppGUI we use two: Eclipse CDT and Visual Studio Code.
- Eclipse CDT is an open source platform composed of a set of C/C++ programming tools available since 2021 on all platforms. To use it we must prepend
Eclipse CDT4to the name of the generator: - In addition to the
Makefile, the.cprojectand.projectfiles necessary to import the project into Eclipse will be created. - Open Eclipse and do
File->Import->Existing Projects into Workspace. A dialog box will appear where we indicate the build directory that we have configured in CMake (/build). Eclipse will open the project by placing a tree with all the files on the left. - To compile
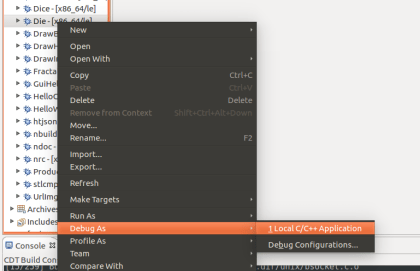
Project->Build All. - When debugging (Die in this case) we display the
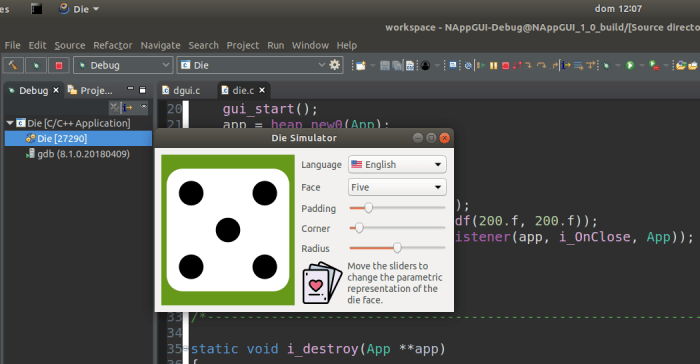
Binariestree, selecting the executable, right clickDebug As->Local C/C++ Application(Figure 22). - Finally we will place the Breakpoints where we are interested and navigate through the code step by step, inspecting variables or the call stack (Figure 23).
|
|
-G "Eclipse CDT4 - Unix Makefiles" -G "Eclipse CDT4 - MinGW Makefiles" -G "Eclipse CDT4 - Ninja" |
Some interesting Eclipse CDT options under Window->Preferences.
- Run/Debug->Launching->Terminate and Relaunch while launching.
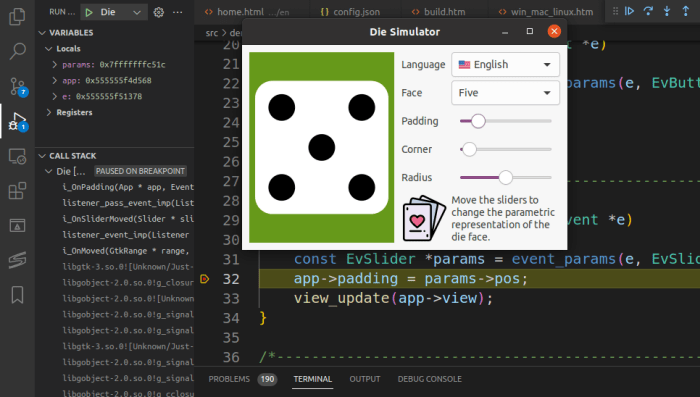
13. Visual Studio Code
Another interesting environment to develop and debug is https://code.visualstudio.com/. With the appropriate extensions, it is possible to work in C/C++ with CMake in a very comfortable and fluid way. You have installers for all platforms, but it is also available from various package managers, for example apt-get:
|
|
sudo apt-get install code |
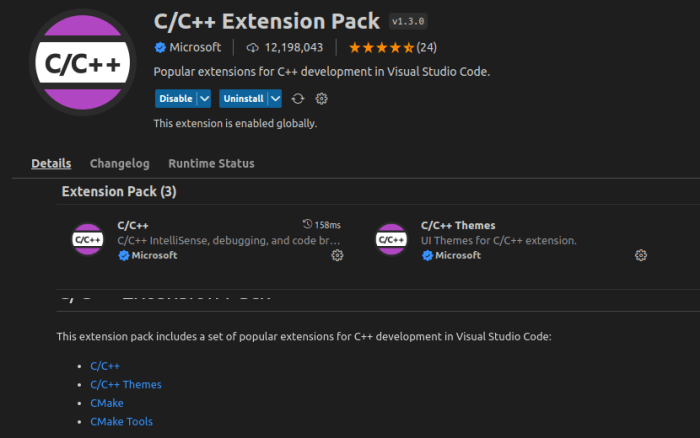
We added, at a minimum, the C/C++ Extension Pack which will also include support for CMake (Figure 24).
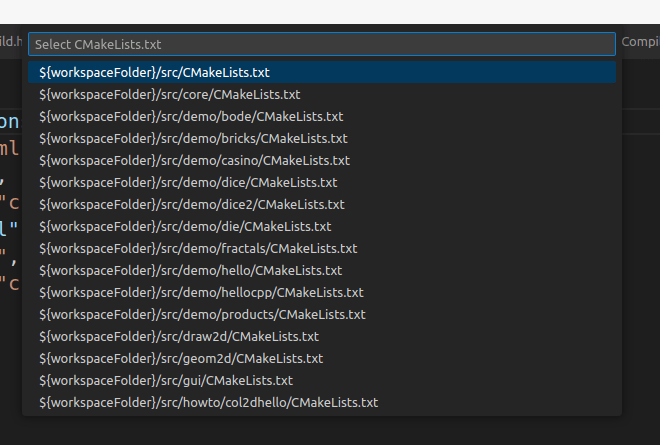
We open our project with Open Folder. Later, we run CMake from the environment itself: [F1]->CMake:Configure. The first time, VSCode will ask for the location of the CMakeLists.txt main (Figure 25) (/src/CMakeLists.txt).
After the configuration we can compile with [F1]->CMake:Build. In the Output tab of VSCode we will see the evolution of the process:
|
|
[build] [ 97%] Building C object demo/die/CMakeFiles/Die.dir/resgen/res_die.c.o [build] [ 98%] Built target Bode [build] [ 98%] Building C object demo/products/CMakeFiles/Products.dir/products.c.o [build] [ 98%] Built target Fractals [build] [ 98%] Building C object demo/products/CMakeFiles/Products.dir/prview.c.o [build] [ 99%] Linking CXX executable ../../Debug/bin/Die [build] [100%] Building C object demo/products/CMakeFiles/Products.dir/resgen/res_products.c.o [build] [100%] Built target Die [build] [100%] Linking CXX executable ../../Debug/bin/Products [build] [100%] Built target Products |
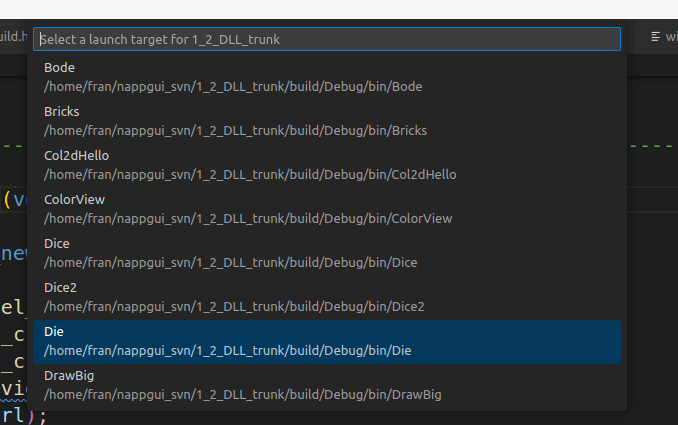
To debug, the first thing is to select the target (or executable) with [F1]->CMake:Set Debug Target (Figure 26).
And we launch the debugger with [F1]->CMake:Debug (Figure 27).