Button
This page has been automatically translated using the Google Translate API services. We are working on improving texts. Thank you for your understanding and patience.
Functions
| Button* | button_push (void) |
| Button* | button_check (void) |
| Button* | button_check3 (void) |
| Button* | button_radio (void) |
| Button* | button_flat (void) |
| Button* | button_flatgle (void) |
| void | button_OnClick (...) |
| void | button_text (...) |
| void | button_text_alt (...) |
| void | button_tooltip (...) |
| void | button_font (...) |
| void | button_image (...) |
| void | button_image_alt (...) |
| void | button_state (...) |
| void | button_tag (...) |
| void | button_vpadding (...) |
| gui_state_t | button_get_state (...) |
| uint32_t | button_get_tag (...) |
| real32_t | button_get_height (...) |
The buttons are another classic element in graphic interfaces, where we distinguish four types: the push button, checkbox, radiobutton and flat button typical of toolbars (Figure 1) . In Hello Button! you have an example of use.
- Use button_push to create a push button.
- Use button_check to create a check box.
- Use button_check3 to create a box with three states.
- Use button_radio to create a radio button.
- Use button_flat to create a flat button.
- Use button_flatgle to create a flat button with status.
- Use button_text to assign text.
- Use button_OnClick to respond to clic.

In addition to capturing the event and notifying the application, the checkbox and flatgle maintain a state (pressed/check or released/uncheck).
- Use button_stateto set the button status.
- Use button_get_state to get the status of the button.
1. RadioGroup
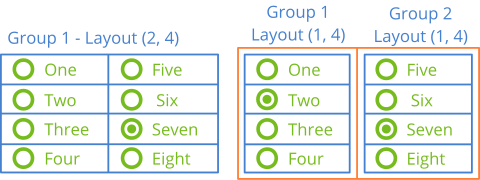
Special mention is required of the radio buttons, which only make sense when they appear in a group, since they are used to select a single option within a set. Groups are formed at the Layout level, that is, all radiobuttons of the same layout will be considered from the same group, where only one of them can be selected. If we need several sub-groups, we must create several sub-layout, as shown (Figure 2) (Listing 1). When capturing the event, the field indexfrom EvButton will indicate the index of the button that has been pressed.

1 2 3 4 5 6 7 8 9 10 11 12 13 14 15 16 17 18 19 20 21 22 23 24 25 26 27 28 29 30 31 32 33 34 35 36 37 38 39 40 41 42 |
Button *button1 = button_radio(); Button *button2 = button_radio(); Button *button3 = button_radio(); Button *button4 = button_radio(); Button *button5 = button_radio(); Button *button6 = button_radio(); Button *button7 = button_radio(); Button *button8 = button_radio(); button_text(button1, "One"); button_text(button2, "Two"); button_text(button3, "Three"); button_text(button4, "Four"); button_text(button5, "Five"); button_text(button6, "Six"); button_text(button7, "Seven"); button_text(button8, "Eight"); // One group - One layout Layout *layout = layout_create(2, 4); layout_button(layout, button1, 0, 0); layout_button(layout, button2, 0, 1); layout_button(layout, button3, 0, 2); layout_button(layout, button4, 0, 3); layout_button(layout, button5, 1, 0); layout_button(layout, button6, 1, 1); layout_button(layout, button7, 1, 2); layout_button(layout, button8, 1, 3); // Two groups - Two sub-layouts Layout *layout1 = layout_create(2, 1); Layout *layout2 = layout_create(1, 4); Layout *layout3 = layout_create(1, 4); layout_button(layout2, button1, 0, 0); layout_button(layout2, button2, 0, 1); layout_button(layout2, button3, 0, 2); layout_button(layout2, button4, 0, 3); layout_button(layout3, button5, 0, 0); layout_button(layout3, button6, 0, 1); layout_button(layout3, button7, 0, 2); layout_button(layout3, button8, 0, 3); layout_layout(layout, layout1, 0, 0); layout_layout(layout, layout2, 1, 0); |
2. Button shortcuts
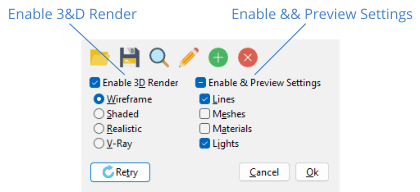
It is possible to define a keyboard shortcut equivalent to click the button with the mouse. To do this, when assigning the button text, we will prepend an ampersand ('&') to the character we want to use as a shortcut (Figure 3). This character will be underlined and the button will be activated when you press ALT+Char (⌘+Char on macOS). To display the '&' character, instead of using it as a mark, use '&&'.
|
|
button_text(button, "Enable 3&D Render");
|

In Default button you have more information about the special shortcut related to the [RETURN] key.
In Linux/GTK, the underlining of the shortcuts occurs when you press ALT, unlike Windows/macOS, which are always visible.
button_push ()
Create a push button, the typical [Accept], [Cancel], etc.
Button*
button_push(void);
Return
The button.
button_check ()
Create a checkbox.
Button*
button_check(void);
Return
The button.
button_check3 ()
Create a checkbox with three states.
Button*
button_check3(void);
Return
The button.
button_radio ()
Create a radio button.
Button*
button_radio(void);
Return
The button.
button_flat ()
Create a flat button, to which an image can be assigned. It is the typical toolbar button.
Button*
button_flat(void);
Return
The button.
button_flatgle ()
Create a flat button with status. The button will alternate between pressed/released each time you click on it.
Button*
button_flatgle(void);
Return
The button.
button_OnClick ()
Set a function for pressing the button.
void
button_OnClick(Button *button,
               Listener *listener);
1 2 3 4 5 6 7 |
static void i_OnClick(App *app, Event *e) { const EvButton *p = event_params(e, EvButton); do_something_onclick(app, p->state); } ... button_OnClick(button, listener(app, i_OnClick, App)); |
| button | The button. |
| listener | Callback function to be called after clicking. |
Remarks
See GUI Events.
button_text ()
Set the text that the button will display.
void
button_text(Button *button,
            const char_t *text);
| button | The button. |
| text | UTF8 C-string terminated in null character |
Remarks
In flat buttons, the text will be displayed as tooltip.
button_text_alt ()
Set an alternative text.
void
button_text_alt(Button *button,
                const char_t *text);
| button | The button. |
| text | UTF8 C-string terminated in null character |
Remarks
Only applicable on flat buttons with status button_flatgle. It will be displayed when the button is in ekGUI_ON status.
button_tooltip ()
Set a tooltip for the button. It is a small explanatory text that will appear when the mouse is over the control.
void
button_tooltip(Button *button,
               const char_t *text);
| button | The button. |
| text | UTF8 C-string terminated in null character |
button_font ()
Set the button font.
void
button_font(Button *button,
            const Font *font);
| button | The button. |
| font | Font. |
button_image ()
Set the icon that will show the button.
void
button_image(Button *button,
             const Image *image);
| button | The button. |
| image | Image. |
Remarks
Not applicable in checkbox or radiobutton. In flat buttons, the size of the control will be adjusted to the image.
button_image_alt ()
Set an alternative image for the button.
void
button_image_alt(Button *button,
                 const Image *image);
| button | The button. |
| image | Image. |
Remarks
Only applicable on flat buttons with status button_flatgle. It will be displayed when the button is in ekGUI_ON status.
button_state ()
Set the button status.
void
button_state(Button *button,
             const gui_state_t state);
| button | The button. |
| state | State. |
Remarks
Not applicable on push buttons button_push.
button_tag ()
Sets a numeric tag for the button.
void
button_tag(Button *button,
           const uint32_t tag);
| button | The button. |
| tag | The tag. |
button_vpadding ()
Sets the inner vertical margin.
void
button_vpadding(Button *button,
                const real32_t padding);
| button | The botón. |
| padding | If |
button_get_state ()
Get button status.
gui_state_t
button_get_state(Button *button);
| button | The button. |
Return
The state.
Remarks
Not applicable on push buttons button_push.
button_get_tag ()
Gets the button's tag.
uint32_t
button_get_tag(const Button *button);
| button | The button. |
Return
The tag value.
button_get_height ()
Gets the current height of the control.
real32_t
button_get_height(const Button *button);
| button | The button. |
Return
The height of the control, which will change depending on the font size and vpadding.


